
FS25 Hella LED v1.0
– Here I’m making my Hella LED prefab file available to you.
– This is intended as an installation option and can replace the original files.
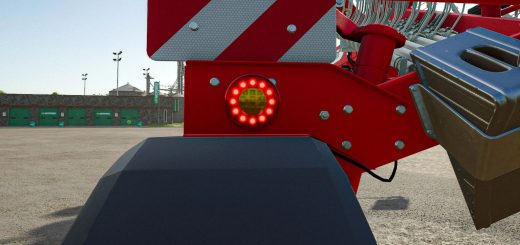
– I’m not a big fan of pure white lights; I prefer a color balance.
– Likewise, I’m not a fan of so-called emissive lights, where only the lens illuminates and the light is merely suggested.
– In this version, the LEDs are implemented separately. This means that only the LEDs light up, while neither the frame nor the lens emits any light.
– Installation Instructions XML.
– Insert the following entry between and in the vehicle’s XML.
Code
X|X|X” filename=”shared/lights/Hella_LED/hellaWorkingLight05.xml” lightTypes=”Y”/>
– Make sure to adjust the `linkNode` value and the `lightTypes` entry according to your desired configuration.
i3d Installation Instructions (LS25)
– Create a TransformGroup, name it as desired, and ensure it is located at the origin (0|0|0).
– Now, place the desired light in this TransformGroup and position the entire TransformGroup at the desired location on the vehicle, trailer, or attachment.
– Then, delete the light from the TransformGroup, but note the TransformGroup’s node (top right in the GE).
– This node is needed to replace the “XXX” entry in the sharedLight.
– Copy the sharedLight entry, adjust it accordingly with your node (XXX) and the desired Y-value, and paste it into the XML between and.
– If you have done everything correctly, you will know that the light can be switched on in the game.
– If you have done everything correctly, you will know that the light can be switched on in the game.
Example Code:
– Replace XXX with the corresponding node from the GE and Y with the desired light type.
– In most cases, already exists.
– You simply need to add the entry `sharedLight` there.
– `linkNode=”X>X|X|X”` describes the LinkNode that you can find in the upper right corner of the GE.
– Enter this value in place of “XXX”.
– The “Y” symbolizes the light type.
– Key assignment: (Change the “Y” as desired)
– 0 = Parking lights / Low beams (1x F key)
– 1 = Rear work lights (2x F key)
– 2 = Front work lights (3x F key)
– 3 = High beams (Key combination: Ctrl + F)
– For any questions, please feel free to contact me on Instagram at Dachau_Agrar or here in the forum.